
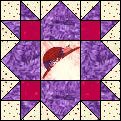
The block for November 2004 is the "Red Hat Weathervane" block
Each finished block measures 12 inches square.
(12 ½ X 12 ½ inches unfinished).
Instructions: Use good quality,
100% cotton pre-washed fabrics.
|
|
The block for November 2004 is the "Red Hat Weathervane" block Each finished block measures 12 inches square.
(12 ½ X 12 ½ inches unfinished).
Instructions: Use good quality,
100% cotton pre-washed fabrics.
|
|
1. 
2. 
3. 
4. 
5. 
6. 
7. 
8. 
9. 
10. 
|
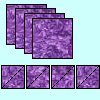
Choose a "Red Hat" society print with
a section that will show nicely in the 4-inch square center. Then
choose a bright red fabric, a purple fabric, and a white-on-white or coordinating
white for the background.
If you cannot find the "Red Hat" fabric in your area, just use the bright red fabric for the center as well. Cutting instructions:
1. From the print fabric, "fussy-cut" one
4 1/2-inch square so that the part you want to display is centered in the
block.. 2. From the red material, cut four 2 1/2-inch
squares.
4. From the background material, cut twelve
2 1/2-inch squares and four 2 7/8-inch squares.
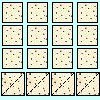
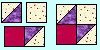
Piecing instructions: 5. Take eight of the 2 1/2-inch white squares and
draw a line from one corner to the opposite corner on the BACK of the fabric.
(If you prefer, you can fold them in half from corner to corner and
press). Either way, this marks a sewing line on each of the squares.
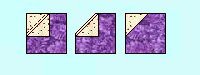
Refering to graphic 5 for placement, lay one 2 1/2-inch
square, right sides together, on a corner of one of the larger purple squares
so that the marked sewing line cuts across the corner of the rectangle.
Sew along this marked line. Trim the corner 1/4-inch away from
the sewing line (toward the corner). Press seam to the dark side.
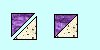
6. Repeat step five with the opposite corner of the purple square. (see graphic 6) 7. With right sides together and using a 1/4-inch seam allowance, sew each of the purple triangles to a white triangle along the long sides. You should end up with four purple & white HST squares like those in graphic 7. Press to the dark side. 8. Using graphic 8 as a reference, assemble the four corner sections. sew half of the HST squares to a red square and half to a 2 1/2-inch white square. MAKE SURE THAT THE SQUARES ARE SEWN TO THE PURPLE SIDE OF THE HST SQUARE AND THAT THE PLACEMENT OF THE PURPLE TRIANGE IS CORRECT.
Assembly instructions:
Your completed unfinished block will measure 12 ½ inches. |